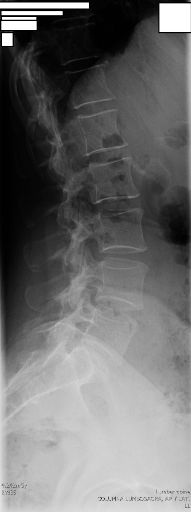
LAT LUMBAR
Lateral Lumbar Spine Projection • Evaluation of vertebral bodies and intervertebral discs
Exposure Factors
Very high mAs: 100 mAs necessary to penetrate lumbar muscle mass and pelvis
Visible Anatomical Structure
The radiograph will show:
- Vertebral bodies from L1 to L5
- T12 (12th thoracic vertebra)
- Sacrum
- L5-S1 joint (lumbosacral)
- Spinous processes
- Transverse processes
- Laminae of the vertebral arch
- Pedicles of the vertebral arch
- Intervertebral disc spaces
- Intervertebral foramina
- Both iliac crests
Plate Sizes and Centering
STANDARD PLATE
Orientation: Longitudinal
Cassette centering: 4th lumbar vertebra (L4)
Central ray centering: 4th lumbar vertebra (L4)
Commonly used
RARELY USED PLATE
Orientation: Longitudinal
Cassette centering: 3rd lumbar vertebra (L3)
Central ray centering: 3rd lumbar vertebra (L3)
Hardly ever used
Both in longitudinal orientation - Centering varies based on plate size
Patient Positioning
Lateral Decubitus (Standard Position)
Complete Support System
Support must be placed:
- Under the lumbar spine so the longitudinal axis of the spine remains parallel to the table plane
- Between the ankles and the table
- Between the ankles
- Between the knees
- Between the knees and the table
Purpose: Prevent torso rotation and maintain the spine in a true lateral position
Alternative Position: Upright (Erect)
When lateral decubitus is not possible:
- Perform standing at the upright bucky
- Same alignment and centering criteria
- Useful for patients with acute pain or difficulty lying down
Functional Study in Flexion and Extension
"If requested by the physician, lateral projections in flexion and extension can be performed"
LUMBAR FLEXION
Patient instruction: "Bring your shoulders as close as possible to your hips"
- Disc spaces opened posteriorly
- Spinous processes separated
- Evaluates segmental mobility
LUMBAR EXTENSION
Patient instruction: "Move your shoulders and hips backward as far as possible"
- Disc spaces opened anteriorly
- Spinous processes approximated
- Evaluates segmental stability
Indication: Evaluation of spondylolisthesis, segmental instability, joint locks
Central Ray Point
Important: Cassette and central ray centering must match according to the plate size used
Optimal Image Characteristics
Vertebrae L1-L5
All included in the field
Intervertebral Discs
Well-defined spaces
Intervertebral Foramina
Neural foramina visible
L5-S1 Joint
Clearly visible
Alignment
Physiological lordosis preserved
Iliac Crests
Both projected
Common Technical Challenges
Frequent issues in lateral lumbar projection:
- Patient rotation due to incomplete support system
- Iliac crest superimposition over L5-S1
- Insufficient exposure (requires 100 mAs minimum)
- Breathing during exposure causing blurriness
- Motion due to lack of leg flexion
- Incomplete field not including T12 or full sacrum
- Excessive lordosis making parallel visualization difficult
- Incorrect centering based on plate size
Solution: Complete support system, 100 mAs minimum, instruct apnea, verify centering according to plate
Special Considerations
Obese Patients
Increase kV up to 90-100 and mAs up to 125-150. Consider non-grid technique for very obese patients.
Acute Pain
Upright position may be better tolerated. Use additional padding for support.
Spondylolisthesis
Perform functional study (flexion-extension) to evaluate mobility and stability.
Lumbar Scoliosis
Align according to the primary curve. Multiple exposures or cone technique may be required.
Patient Instructions
"During exposure, the patient must not breathe"
Full sequence:
1. "Lie on your side"
2. "Flex your knees to be comfortable"
3. "Place your elbows in front, flexed at 90°"
4. "Take a deep breath and then let it all out"
5. "Hold your breath and do not move"
6. "Stay still until I tell you"